1500+ reviews

You're walking around your Magnolia home when a thin, dirt-colored line catches your eye on the concrete foundation. It looks too deliberate to be ordinary soil, but too small to seem like a serious problem. That narrow mark may be a subterranean termite shelter tube, and the visible section may represent only one access route from a hidden colony.
The practical answer to what do termite tunnels look like is more nuanced than “a pencil-sized line of mud.” Tubes can be narrow, dry, branching, patchy, or blended so closely with masonry that homeowners miss them during a quick inspection. Knowing where to look, how the material behaves, and whether the structure is active gives you a much better starting point than scraping it away and hoping the termites disappear.
Identifying Termite Shelter Tubes on Your Property
A subterranean termite shelter tube is an earthen passage built across an exposed surface. It usually appears as a narrow, crusted line of dried dirt on a foundation, wall, crawl-space pier, or masonry surface. The purpose is protection. Termites use the covered route to travel between soil and a food source while reducing exposure to dry air and predators.
During a preliminary check, start at the places where the ground, structure, and moisture meet. Walk the entire exterior perimeter with a flashlight, even if the suspicious mark is only on one side of the house.
Where to direct your flashlight
Check these areas closely:
- Foundation walls: Look for vertical lines rising from soil, landscaping, expansion joints, or slab edges.
- Masonry and concrete: Inspect cracks, corners, utility penetrations, steps, and areas where tubes can follow an irregular surface.
- Crawl-space piers: Examine both sides of wooden or masonry supports, especially where the pier meets the ground.
- Wooden supports: Check sill plates, joists, porch framing, and other wood located close to soil.
- Fence lines and outdoor wood: Stumps, timbers, and fence posts can provide nearby access points even when the house itself shows little visible evidence.
The tubes are commonly about pencil-width, roughly one-quarter inch, according to Texas A&M AgriLife's reference on subterranean termites. That description helps, but don't treat it as a strict measurement. A tube may look like a raised dirt seam, a flattened strip, or a thin crust that disappears around a corner.
Practical rule: Photograph the tube before disturbing it. Include a close view and a wider image showing its location on the property.
You can also compare your observation with this guide to what to do after spotting a termite mud tube. The key point is simple: a visible tube deserves inspection, but its presence alone doesn't tell you how far the colony has traveled or whether the route remains active.
The Variable Size and Texture of Mud Tubes
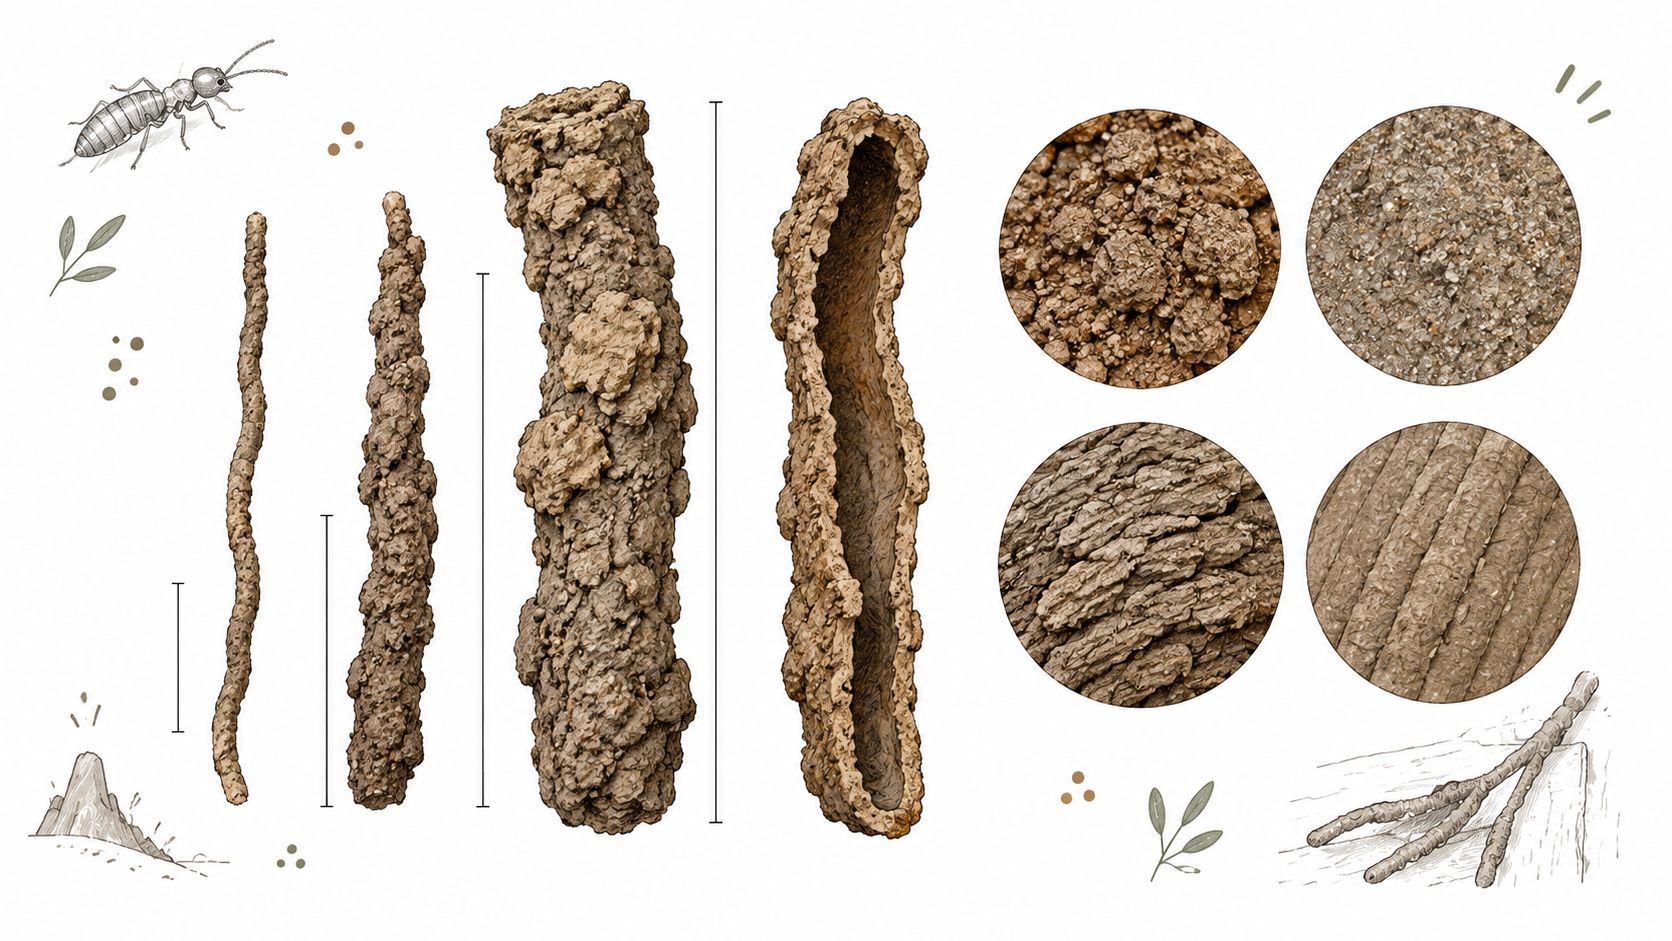
The building material is a mixture of soil or wood particles bound with termite saliva and fecal matter. That blend produces an earth-toned surface that can resemble dried dirt, tan soil, brown sediment, or a gray crust. On concrete, the tube may be only slightly darker than the wall. In a crawl space, it can blend into dusty masonry or exposed soil, so a quick visual check may miss it. The material composition is described by Texas A&M AgriLife.
Why width isn't a reliable diagnosis
Field observations show that tubes may range from one-quarter inch to one inch or larger, particularly where a colony is active and established. A narrow route may serve as a protected passage, while a wider section can reflect repeated travel, repairs, or a need to move more workers and material. Width should guide inspection, not decide the diagnosis.
Scientific work also describes narrower egress structures measuring 3 to 5 millimeters. Other termite species build fewer, wider, less-branched tunnels. The research in this study of termite tunnel architecture helps explain why a suspicious line should not be dismissed because it is thin or lacks a rounded profile.
Texture offers additional clues:
- Dry and crusted: Exposure to air or changing moisture may harden the outer surface.
- Patchy or incomplete: Termites may cover only the section needed to cross an exposed area.
- Rough and granular: Sand, soil, wood particles, and organic debris can leave an uneven finish.
- Flattened against masonry: Limited space and pressure from the wall can make the tube look like a dirt smear.
- Slightly damp or compact: Moisture can keep the material cohesive and make it appear darker.
Texas soil conditions affect what an inspector sees. Sandy material may leave a loose, grainy surface, while clay-rich soil can form a smoother, denser crust. Moisture near slab edges, shaded crawl spaces, or poorly drained areas can also keep tubes darker and less brittle.
Species, humidity, available particles, and the tube's function all influence its final shape. A narrow, dry, or broken-looking tube doesn't rule out activity, while a thick tube does not prove termites still use it. Appearance identifies where to investigate. Activity requires a closer check of the route, surrounding soil, and nearby wood.
Understanding the Hidden Branching Network
A straight line on a foundation can give the wrong impression. It suggests a single route with a clear beginning and end, but subterranean termites often work through a branching system that changes as workers locate food and encounter crowded areas.
Research described by the International Research Group on Wood Protection found that tunnel systems can radiate from discovered food sites, intercept nearby sites, and branch again. Related species also differed in how much they branched. At congested tunnel faces, workers may extend the existing route or create a side branch, depending on the conditions they encounter.
One visible tube can have many hidden connections
The section you see on the foundation may be only the exposed part of a larger foraging system. Other routes may remain underground, pass through cracks, follow the slab edge, or enter structural wood without creating a conspicuous surface line.
That distinction matters during an inspection. If a homeowner scrapes off one tube, the colony hasn't necessarily lost access. Workers may repair the route, abandon it and construct another, or continue using a concealed pathway. Removing the evidence can also make it harder to document where termites were traveling.
A mud tube is a route, not a colony map.
Look beyond the most obvious line. Follow its direction toward the soil and toward any nearby wood. Check adjacent corners, penetrations, piers, porch framing, fence posts, and areas where grade or mulch may conceal the foundation. A branch can be subtle, especially when its earthen surface matches the wall.
The network perspective also explains why appearance can change along one structure. A frequently used passage may be compact and reinforced, while a newer exploratory branch may look thin, fragile, or incomplete. A congested area may show several parallel lines or short offshoots rather than one clean vertical tube.
This is why the answer to what do termite tunnels look like should include architecture, not just color and width. The visible tube may be straight in one section, curve around an obstruction, split near a food source, and disappear into a crack. Treat every unusual earthen line as part of a possible route system until an inspection establishes otherwise.
Active Infestation Versus Historic Damage
A mud tube can remain after termites stop using it, so the structure's condition matters. An old tube doesn't prove that termites are inside the walls today, but it also doesn't clear the property. A colony may have moved to another entry point, or the visible route may be only one of several.
Start with a careful visual comparison. Active material is often darker, more cohesive, and slightly moist, while historic material tends to become dry, brittle, cracked, and flaky. These are practical indicators, not absolute rules. Weather, shade, irrigation, soil type, and exposure can change how quickly a tube dries.
What to check without causing unnecessary damage
Use a flashlight and a blunt tool rather than digging aggressively into the wall or wood. Note whether the tube is intact, whether fresh material appears lighter or darker than surrounding sections, and whether the route connects directly with soil or wood.
The break-test can provide a useful activity clue. Break a small section near the middle, leave the surrounding tube in place, and photograph the opening. Check it again over the next few days. Repair activity suggests termites are still using the route, while an unrepaired gap suggests that particular section may be abandoned. An empty opening isn't conclusive because termites can choose another route.
| Feature | Active Tunnel | Historic Tunnel |
|---|---|---|
| Surface | More solid, compact, or recently formed | Dry, brittle, cracked, or flaking |
| Moisture | May feel slightly damp, especially in a protected area | Usually dry and powdery |
| Interior | May contain live workers or fresh material | Often hollow, dusty, or empty |
| Break-test result | Colony may rebuild the damaged section | Gap remains unchanged |
| Inspection meaning | Requires prompt professional assessment | Still documents possible past access |
Don't confuse the tube's condition with the condition of nearby wood. A dry tube can sit beside active damage, and an active-looking tube doesn't reveal how much structural wood has been affected. Check for soft areas, hollow-sounding timber, blistered surfaces, discarded wings, and moisture sources, then document everything before repairs or cleanup.
Wood that touches soil deserves attention even when no tube is visible. If you're also dealing with decay around a fence, guidance on how to stop wooden fence posts rotting can help separate moisture-related deterioration from termite evidence. Both problems can occur together, and fixing rot alone won't address a hidden termite route.
Professional Inspection in the Magnolia Area
Magnolia, Texas, sits in southwestern Montgomery County within the Houston metropolitan area. The U.S. Census Bureau lists the city's 2020 population as 2,359 in its Magnolia QuickFacts profile. A local inspection also has to account for continued development. Magnolia's official demographics page gives a 2024 population estimate of 5,836, while the earlier census comparison records growth from 1,393 in 2010 to 2,359 in 2020. Those figures come from the city demographics page and the linked Magnolia population comparison.
That growth changes the inspection context. New construction, altered grades, fresh landscaping, additions, and drainage changes can create different moisture patterns from one property to the next. Magnolia's regional service connections also matter. Independent city-profile information places The Woodlands about 13.9 miles away, Conroe about 17.3 miles away, and Kingwood about 34.4 miles away, as shown by nearby-community planning information for Magnolia.
What a Magnolia inspection looks like
A technician shouldn't stop at the most visible foundation wall. A practical Wood-Destroying Insect inspection typically follows the structure from outside to inside:
- Exterior perimeter: The inspector examines slab edges, masonry joints, porch transitions, utility penetrations, mulch lines, and areas where soil or planting beds hide the foundation.
- Crawl spaces and supports: In pier-and-beam construction, the technician checks piers, sill areas, joists, plumbing penetrations, and wood close to damp soil.
- Moisture and drainage: Downspouts, irrigation, standing water, leaking hose connections, and soil grading can help explain why termites selected one approach.
- Wood and fence lines: The inspection extends to fence posts, stumps, timbers, sheds, decks, and other wood that may connect activity to the home.
- Interior evidence: Baseboards, window areas, flooring transitions, wall penetrations, and accessible structural wood receive attention when the exterior evidence points inward.
Local inspection insight: Soil and construction conditions change from lot to lot, so a tube's location can be as informative as its appearance.
A qualified technician records evidence, checks for active insects or fresh repair, evaluates conducive conditions, and distinguishes termite signs from ordinary soil deposits or moisture damage. For background on why this process matters in Texas homes, review the importance of termite inspections for Texas homeowners. Don't rely on a single scraped patch or a quick glance from the driveway.
Next Steps for Treatment and Prevention
Once a professional confirms active termites, the useful question changes from “Can I remove this tube?” to “How do I interrupt the colony's access and protect the structure?” Spraying the visible surface may kill exposed insects, but it doesn't reliably reach underground workers, hidden routes, or the colony. Scraping tubes away has the same limitation. It removes evidence without creating a dependable barrier.
Treatment should match the building, soil conditions, construction, activity pattern, and inspection findings. Common professional approaches include:
- Liquid soil barriers: A licensed technician treats the soil around relevant foundation areas to create a treated zone between the colony and the structure.
- Targeted baiting systems: Bait stations can support a monitoring strategy and allow technicians to track termite feeding over time.
- Localized wood treatments: Accessible, affected wood may receive focused treatment when inspection findings identify a limited area.
- Corrective repairs: Drainage issues, leaks, wood-to-soil contact, and concealed entry points need attention so the treatment isn't undermined by the same conditions that attracted termites.
The right plan may combine methods rather than rely on one product. A professional can explain the trade-offs between immediate localized control, broader soil treatment, ongoing monitoring, and repairs that reduce future access. FullScope Pest Control is one local provider that offers termite inspections, monitoring, and targeted control options in the North Houston area. You can review its termite control options when comparing approaches.
Prevention begins outside the tube
Keep foundation edges visible enough to inspect. Direct drainage away from the structure, correct plumbing or irrigation leaks, and avoid leaving untreated wood in direct contact with soil. Remove stumps and unnecessary wood, and make sure fence or deck construction doesn't create concealed bridges to the house.
Don't seal cracks, replace trim, or rebuild a damaged fence until the inspection is complete. Cosmetic repairs can hide evidence and make it harder to identify the original entry route. After treatment, keep the inspection record, photograph repaired areas, and follow the technician's monitoring schedule.
A suspicious tube in Magnolia deserves prompt attention, even when it looks dry or insignificant. Photograph it, avoid destroying the evidence, inspect nearby soil-to-wood contacts, and arrange a licensed evaluation of the full property rather than one visible wall.
If you've found a narrow earthen line on your foundation, crawl-space pier, fence post, or masonry, contact a licensed Texas pest professional for an inspection before repairing or removing it. Share the location, photos, moisture conditions, and any break-test observations so the technician can determine whether the tunnel is active and recommend a treatment plan suited to your Magnolia property.